
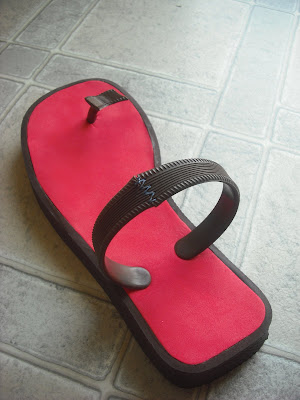
I had some old flip flops I was gonna toss. they were cute when I bought them 7+ years ago, but the woven insole stuff started looking really ratty (more so on the left than the right, I just noticed!) and parts would fall off every time I wore them. I figured why not see if I can change them before they go? if it didn't work out, I could still toss them.
so, this is what I started with. Old Navy flip flops - I think I paid $5 for them, and I've definitely got my money's worth over the years.

they have a woven mat on top of a foam base and there's a strip of foam wrapped around the edge. to get the woven mat out I cut the straps at the toe leaving enough so it didn't slip between my toes, and pulled the straps through the holes of the mat.


I traced and cut two pieces of craft foam the size of the mat for each sandal and did a dry fit to see what needed to be trimmed. I measured the straps across the top of my foot, cut them to size, and stitched them together with some heavy duty thread I had.


I was going to go strictly on supplies I had in my craft closet, but when I decided I didn't like the red and that it might be hard to paint on top of, I broke down and popped over to the new Dollar Tree down the road and bought a $1 roll of white foam. I pulled the red out and cut new white foam pieces, then I traced a
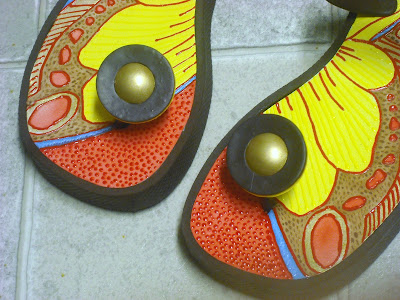
butterfly wing pattern onto it with a pencil. I cut holes for the straps and toe post and made slits to access them. one more dry fit and trimmed the overhang.


then it was time to paint. I watered down some acrylic paint and painted inside the lines, then went over the lines with dimensional paint after it was dry. it still looked plain with just the outline, so I did some more lines and dots to fill in.


I was a little stumped on what to use for the toe post. I didn't have any buttons big enough, so I went with polymer clay. I wanted to add a domed cap to it, too, so I searched my bottle cap stash for some solid gold colored caps.


before they're domed they need to be trimmed down to a flat disc, so I used pliers and bent the edges down. once it was easier to get my scissors around the rim, I trimmed a rough circle, then followed the inner plastic ring to get a more round and flat shape.


the inner plastic needs to come out or it'll make an uneven dome, and lucky for me these peeled right out! some types are a little more stubborn and require a razor, heat, throwing of tools and swearing ;) but not the case this time :D anyway, so then to shape it. I would explain this process, but ya just hafta do it and get a feel for it. you can watch me use my dapping block
here.


so then to make the actual toe post cover thing. I rolled out some yellow and brown polymer clay and used an old plastic egg to cut the circle, then I pressed the gold domes in the center and baked them until the clay was hard. while they were still warm and flexible, I pried the domes out.


for the straps I wanted a
5 strand braid, so I needed 5 different colors... but I didn't have the colors I needed, so I took an old white t shirt and painted some stripes about 2" thick across it, cut them out into 1 inch strips, stretched them until they rolled, and braided them together. the paint made the fabric a little stiff, but it wasn't going to be directly next to my skin so that didn't bother me.


once I had the length I needed to cover the strap, I sewed across the ends and trimmed the rest. I added some leather to finish the edge off and sewed that in place, too.


I used contact cement to adhere the 2 new layers of foam to the sole of the sandal. very smelly and sticky, but it did the trick! once the sole was in place I drilled some holes through the old toe strap piece and the polymer button, sewed them together, and hot glued the domes back in place to cover the stitches. then I glued the braids to the straps and she's done!


I'm pretty happy how they came out - time will tell how much more wear they'll be good for.


I know all the work of painting the wings on the insoles is hidden when they're worn, but I like knowing it's there. kinda like a fun little secret for my feet to keep :)


