Showing posts with label how-to. Show all posts

Thursday, August 29, 2013

scalloped washcloth pattern

I saw some dishcloths online and wanted to make my own as washcloths for Mother's Day with some cotton twine I had.  I studied the picture and came up with how to do it.  while writing my pattern it seemed a little difficult to follow, but this is really an easy one to do - I just don't know how to write it out so it's not confusing!
a cotton yarn like Sugar and Cream with a size 5.5mm hook works well with this pattern.

ch = chain
dc = double crochet
sc = single crochet
sk = skip
sl st = slip stitch
st = stitch

round 1:
12 sc into loop, pull tail tight, sl st into 1st st to join round

round 2:
ch 5 (counts as 1 dc and ch 2 corner)
*1 dc in next 3 sts, ch 2 to make corner, repeat from * 3 times
sl st in top of the first dc (the ch 3) to join round, and sl st into ch 2 corner space
total of 12 dc sts (including beginning ch 3)

rounds 3-8:
ch 3 (counts as first dc)
1 dc, ch 2, 2 dc into corner space
*1 dc in between each dc from previous row
2 dc into the ch 2 corner space, ch 2, 2 dc into same ch 2 corner space
repeat from * 2 more times
1 dc in between each dc on the last side
sl st to join into first dc (the ch 3 from beginning of row), and sl st into ch 2 corner space
total of 24, 36, 48, 60, 72, and 84 dc sts (including beginning ch 3)

round 9:
ch 3 (counts as first dc)
8 dc into ch 2 corner space
side: (sk 2 dc sts and sc in between dc sts, sk 2 dc sts and do 7 dc in between dc sts) - repeat 3 times
corner: (sk 2 dc sts and sc in between dc sts, 9 dc into ch 2 corner space - you'll be skipping 3 dc sts this time)
repeat side and corner for the next 2 sides
repeat side once more, then sl st into the top of the ch 3 of the 1st corner to join round
weave in ends
total of 168 sts (including beginning ch 3)

optional:
if you want to add a loop to hang the washcloth from, when you get to the 4th corner, between the 4th and 5th dc, make a ch 10 and sl st to the first chain, then continue in the pattern.

once you get the hang of these, they whip up in no time.  this one is sort of a mindless project for me, but I think a video might work better to see that than my written pattern.  I will try to work on that.

Thursday, June 20, 2013

pressed flowers hand soap dispenser

this is the soap dispenser I did for Mother's Day with laminated pressed flowers.  I've never laminated anything (besides paper at work) so I wasn't sure how this would come out, but it really made the colors of the pressed flowers pop.  I pressed rose petals and cut them to a nice size/shape and added stems from weeds growing in my yard to create made-up flowers.  I'm sure this is a big no-no in the pressed flower world, but I wanted something pretty and this was how I could achieve it with what I had.
I started by making a template to cut around later.  after tracing the dispenser I went in about 1/4" from the outer line and trimmed it until it looked like it would fit inside.
I laminated my flowers making sure to leave lots of space around each of them, placed the template under the transparency and traced around it with a dry erase marker so the lines would easily wipe off later, and cut it out.
I put the insert I already cut on top of the other to decide how I wanted the position of the other to be, and traced around that one the same as before, but on this one I left the top a little longer so it was easier to separate the two once they were in the dispenser.
I removed the labels from the outside, and drained the soap from the dispenser so it was easier to put the inserts inside.
I rolled the inserts together (making sure the front was facing the side I wanted to use for the front) and put them inside the dispenser.
the tricky part was prying the front and back inserts apart so I could put the pump tube in between them, but it really wasn't that difficult with one of the tops being a little higher than the other.  once the pump tube was in I just poured all the soap back in.
I like the ones I did initially better, but even just these two "flowers" makes this cuter than the regular dispenser.  I suppose I could always add more layers as I find more flowers to press.

Thursday, May 30, 2013

photo pocket mirror

I found some pocket mirrors at Michael's and thought they'd be really cute gifts for Mother's Day if I put pictures on the fronts.
I peeled the front part off - this wasn't easy and I had to be careful not to scuff the outer rim, which I did on all but one of them no matter how hard I tried to avoid it - and cleaned as much sticky off the inside as I could.  that turned out to be a waste of time because it didn't really matter if there was residue on it.
I printed off a photo slightly smaller than the inside of the indent, then laminated, and trimmed it to size.
then I put doubled sided carpet tape (found it at Home Depot in the flooring department) on the back (that stuff was super sticky!) and stuck it to the front of the mirror.
it wasn't exactly how I imagined it, but it was still cute!

Thursday, May 16, 2013

wire bails

after making the fractured marble pendants a while back I have had so many new visitors to my blog  - thanks all you pinterest fiends ;)  over 24k views.  crazy.
when I started baking the marbles, I realized I didn't have any bails to turn them into necklaces with - whoops.  so I grabbed some wire from my stash and cranked out a few quick bails.  I thought for half a second "should I put this process in there?"  and never did because at that point I was done making them.  shoulda coulda woulda.  so, 8ish months later here is how I did them.

Thursday, April 18, 2013

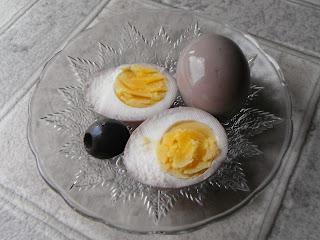
easy pickled eggs

after doing pickled beet eggs again I wanted to see what else I could pickle eggs in that was already on hand in the fridge.
beet juice, onion powder, and sugar
 regular pickle juice
sweet gherkin juice
banana pepper juice (our favorite)
black olive juice
(Matt said this one tasted like pickled fish)
Worcestershire, apple cider vinegar, and brown sugar
pimentos, apple cider vinegar, and distilled water

they're real easy and all ya gotta do is boil your eggs, de-shell, and soak in whatever ya want for at least a day in the fridge.  I soaked mine for two days.  I also made an extra egg to cut into and check the yolk for doneness after boiling them... which mine was, but all the ones I pickled (minus the pimento) looked not quite done after I opened them.  weird.  anyway, it was fun to try different flavors but I think banana pepper is the one I'll be keeping stocked in the fridge.

Thursday, April 11, 2013

center-pull yarn ball

I like to wrap my yarn into balls, then put them into this glass pitcher I have to keep the yarn clean and contained while I work with it, which has been just fine, but sometimes I have a ball too big to fit inside the opening and I really don't like cutting the yarn and rejoining later.
I searched videos on youtube to see what I could do to make a center-pull ball and found a bunch of variations on rolling one by hand.  I like this one on wrapping around a cardboard tube.
I used a pen tube so the hole in the middle was smaller and the ball wasn't too big when it was done.  after I ran the yarn through the tube I pushed the tip of the pen back in just enough to hold the yarn in place while I wrapped the ball.
it came out a little egg shaped as I wrapped, but once it was off the tube I was able to round it out.

Thursday, September 20, 2012

simple necklace

I found some bezels with sticky epoxy domes at Michael's - pack of two for $4 - and thought it'd work great for putting Jack's sonogram profile picture in :)
it came to me that I could use sticker paper and not have to mess with glue and worrying about it soaking through the back of the paper and mucking up the ink when I tried to put it into the bezel, so I pulled out my folder of crap that I save to see if I had any sticker paper.
I had a couple of packing slips from old diaper deliveries that had a mostly blank adhesive label on them, so I measured out where that spot was on the paper and how big it was, and sized two of my pictures of Jack in to that area and printed them out.
 
I pressed the epoxy sticker onto the sticker paper and cut around it.
 then all I had to do was peel the back off the sticker paper, press it into the bezel, and put it on a chain.
I love how it came out and I can't wait to see his little button nose in person :)

Monday, May 21, 2012

belts for Leo

Leo is in a long and skinny phase where for his pants to be long enough they're too big in the waist, so I made him some D-ring belts.

to make a simple ribbon belt you'll need:
  • ribbon (grosgrain works best for me, but experiment and find what you like)
  • D-rings
  • sewing machine/needle & thread
  • optional: fray check or lighter
determine the length you want the belt to be (I made Leo's  24" long), double it, and add 3/4".  cut to size and melt the ends of the ribbon if it's synthetic, or glue them if it's natural fibers to keep them from fraying.
overlap the D-rings by 1/2" and sew across. with the other end, fold in half and overlap the end you just sewed by 1/4" and sew across really well.
sew from the end with the d-rings all the way down to the other end. turn and sew across the folded edge, then turn again and sew back up the other side to the d-ring end. turn again and sew across to where you started from, back stitch to secure your stitches, and that's it! 

Thursday, May 17, 2012

t-shirt refashion how-to

I got this shirt a few years ago with the intention of making it over.  after wearing it as-is for a while I finally changed it up, and it was so simple I wish I had done it forever ago!

supplies needed:
  • 2 t-shirts (or 1 t-shirt and scrap fabric of the same or similar fabric type)
  • sewing machine
  • scissors
lay the shirt flat, line up the seams at the shoulders and smooth down to the under arms. cut through both layers following the curve of the sleeve and taper in toward the neckline. cut the shoulders apart, fold the front down and re-cut the back so it's more narrow than the front.
pull the top part back up and trim the front so that it follows the back angle if you want to use the neckband as your casing, but I didn't like how it gathered so I cut off the neck band from the front and back making the front more of a straight line.
sew a hem on both sides going from the front to the back (or just leave it unfinished), then fold over 1/2" on the front and sew that down to make the front casing.
for the back casing cut a scrap of fabric to the same width as the back of the unfinished part of the top of the shirt (remember to add some for the seam allowances) and twice as wide as you want your casing to be.  if you want the back of the shirt higher make the casing long, and if you want it lower in back make the casing shorter. hem the sides of the scrap and fold in half.  with the unfinished edges together, line up with the raw edge of the shirt and sew across (I don't have a picture of that - sorry!) then flatten out the seam and sew across so that it lays flat.
braid 3 straps of the scrap together, sewing across the ends and cutting them straight.  put a safety pin on one end and fish it through the casing on the front and back of the shirt (no pic for this either) and mark where to cut it so the straps are the right length. straighten out the braid so it's not twisted and stitch both ends together so they're flat, and pull it back through the front casing to hide the join.
this step is optional:  take more scrap fabric and make a band for the bottom by cutting two rectangles that measure half of your hips (or wherever the shirt hits you) plus 1/2" for seam allowance, and twice as wide as you want the band to be.  put the rectangles right sides together (I used the wrong side of the fabric for mine) and sew along the short sides, then turn the tube down in half to make the folded edge.
insert the shirt into the tube so that the raw edges of the band line up with the bottom of the shirt, pin at the side seams and find the halfway points of the front and back on the band and the shirt and pin those spots together. stretch the band as you sew to make the fabric line up, then turn the band down.
I love the design of this shirt and will be making more of these for the summer :)