Showing posts with label pattern. Show all posts

Tuesday, November 11, 2014

advent calendar garland: crochet hats

I winged this pattern the first time and it came out exactly as I hoped, so I wrote it down.  I did it bottom up, which I normally don't like to do, but this one made sense to do that way since it was pointy, and the ribbing would match the look of the mittens and stockings (patterns available here and here).  you'll need 12 hats for the garland.
hat pattern

ribbing:
ch 7, 1 sc into back bump of 2nd ch from hook and following 5 sts, ch 1 and turn.
1 sc into back loop of each st across, ch 1 turn.  repeat for 26 more rows.
fold ribbing in half and sl st closed.

body of hat:
ch 1, make 30 sc sts, equally spaced, around the top edge of ribbing, sl st to join round.
ch 1, sc into each stitch around, sl st to join.  repeat for 4 more rounds.

decreasing:
ch 1, *1 sc into next 4 sts, 1 sc2tog, repeat from * 4 more times, sl st to join.
ch 1, 1 sc into each st around, sl st to join.
ch 1, *1 sc into next 3 sts, 1 sc2tog, repeat from * 4 more times, sl st to join.
ch 1, 1 sc into each st around, sl st to join.
ch 1, *1 sc into next 2 sts, 1 sc2tog, repeat from * 4 more times, sl st to join.
ch 1, 1 sc into each st around, sl st to join.
ch 1, *1 sc into next sts, 1 sc2tog, repeat from * 4 more times, sl st to join.
ch 1, 1 sc into each st around, sl st to join.
ch 1, 5 sc2tog, sl st to join.
ch 1, 1 sc into each st around, sl st to join.
fasten off with a 10" tail, using yarn needle, thread yarn tail through the front loop of the remaining 8 sts and pull tight.
weave in ends.

attach pom pom to top of hat.

optional loop:
fold hat in half, attach yarn to the top left corner of ribbing, ch 10, sl st to first ch, tie knot with starting tail and weave in ends.

Monday, November 10, 2014

advent calendar garland: crochet stockings

I sorta mixed-n-matched some patterns to make a stocking.  I used the basic starting point of the mittens (check out the previous post here for the pattern), but didn't increase for the thumb part of the hand.  when it was long enough to my liking, I did the heel and toe like Yolanda demonstrates in her Christmas stocking video tutorials.  you'll need 7 stockings for the garland.
stocking pattern

ribbing:
ch 7, 1 sc into back bump of 2nd ch from hook and following 5 sts, ch 1 and turn.
1 sc into back loop of each st across, ch 1 turn.  repeat for 20 more rows.
fold ribbing in half and sl st closed.

body of stocking:
use the same color yarn or attach new color.
ch 1, make 24 sc sts, equally spaced, around the top edge of ribbing, sl st to join round.
ch 1, sc into each stitch around, sl st to join.  repeat for 8 more rounds.

heel:
use the same color yarn or attach new color.
ch 1, sc into 12 sts, ch 1 and turn.
sc2tog into first 2 sts, 1 sc into each st across, sc2tog into last 2 sts, ch 1 and turn.
repeat decreasing row until you have 4 sts left.
2 sc into first st, 1 sc into each st across, 2 sc into last st, ch 1 and turn.
repeat increasing row until you have 12 sts again, ch 1 turn.
1 sc into all 12 sts across.
fold heel in half, right sides facing, and sl st or whip stitch seams together. 

foot:
use the same color yarn or pick up yarn from before the start of the heel.
ch 1, sc around ankle and heel (24 sts), sl st to join, ch 1 and turn.
1 sc into each st around, sl st to join, ch 1 and turn. repeat for 6 more rounds.

toe:
use the same color yarn or attach new color.
ch 1, *1 sc into first 4 sts, sc2tog.  repeat from * around, sl st to join, ch 1 and turn.
*1 sc into 3 sts, sc2tog.  repeat from * around, sl st to join, ch 1 and turn.
*1 sc into 2 sts, sc2tog.  repeat from * around, sl st to join, ch 1 and turn.
*1 sc into 1 st, sc2tog.  repeat from * around, sl st to join, ch 1 and turn.
sc2tog 4 times, sl st to join.
fasten off with a 10" tail, using yarn needle, thread yarn tail through the front loop of the remaining 4 sts and pull tight.
weave in ends.

optional loop:
fold stocking in half with heel on the left side, attach yarn to the top left corner of ribbing, ch 10, sl st to first ch, tie knot with starting tail and weave in ends.

Sunday, November 9, 2014

advent calendar garland: crochet mittens

I saw a mini mitten garland in one of the shops on the Strand in Galveston and thought along with some stockings and hats, it would make a cute little advent calendar.

I started crocheting November 1st, my goal to make one a day so by December 1st it would be ready to go.  I always cram too much into my holiday seasons, why would being pregnant, having an ill household, and house hunting make the slightest difference in the workload I put on myself? :\  so far it's going okay, though.  one a day is definitely a doable goal.

I'm using up leftover scraps from my yarn stash, other stuff I had on hand, and the patterns are free.  this project mostly cost me my time in the evenings while I watch TV, so besides it coming along to be adorable, it is practically free and I love that! :)

so this first pattern is mittens.  you'll only need 6 of these. I would say this is the more difficult of the patterns, so once you learn this one the rest will come easier.

the preschool size mittens pattern from CrochetMe is what I'm using.  I usually prefer videos, but this written pattern is easy enough to follow.  I think hers is worked in a continuous circle from the way it's written, but the copy I have below is written so that each round is joined.  it's still basically the same, I just typed it out so it was easier for me to work from.

mitten pattern

ribbing:
ch 7, 1 sc into back bump of 2nd ch from hook and following 5 sts, ch 1 and turn.
1 sc into back loop of each st across, ch 1 turn.  repeat for 19 more rows.
fold ribbing in half and sl st closed.

body of mitten:
ch 1, make 23 sc sts, equally spaced, around the top edge of ribbing, sl st to join.
ch 1, 1 sc into each of the next 10 sts, 2 sc into the next st, 1 sc into each of the next 2 sts, 2 sc into the next st, 1 sc into each of the next 9 sts, sl st to join.
ch 1, 1 sc into each st around, sl st to join.
ch 1, 1 sc into each of the next 11 sts, 2 sc into the next st, 1 sc into each of the next 2 sts, 2 sc into the next st, 1 sc into each of the next 10 sts, sl st to join.
ch 1, 1 sc into each st around, sl st to join.
ch 1, 1 sc into each of the next 12 sts, 2 sc into the next st, 1 sc into each of the next 2 sts, 2 sc into the next st, 1 sc into each of the next 11 sts, sl st to join.
ch 1, 1 sc into each st around, sl st to join.
ch 1,1 sc into each of the next 13 sts, 2 sc into the next st, 1 sc into each of the next 2 sts, 2 sc into the next st, 1 sc into each of the next 12 sts, sl st to join.
ch 1, 1 sc into each st around, sl st to join.
ch 1, 1 sc into each of the next 14 sts, 2 sc into the next st, 1 sc into each of the next 2 sts, 2 sc into the next st, 1 sc into each of the next 13 sts, sl st to join.
ch 1, 1 sc into each of the next 12 sts, skip the next 10 sts (for thumb), 1 sc into each of the next 11 sts, sl st to join.
ch 1, 1 sc into each st around, sl st to join.
repeat previous round for 9 more rounds.
ch 1, [1 sc into each of the next 6 sts, sctog] 2 times, 1 sc into each of the next 5 sts, sc2tog, sl st to join.
ch 1, [1 sc into each of the next 3 sts, sc2tog] 4 times, sl st to join.
ch 1, 1 sc into each st around, sl st to join.
ch 1, sc2tog 8 times, sl st to join.
fasten off with a 10" tail, using yarn needle, thread yarn tail through the front loop of the remaining 8 sts and pull tight.
weave in ends.

thumb:
join yarn to any thumb stitch and make 10 sc stitches around, sl st to join.
ch 1, 1 sc into each st around, sl st to join. repeat for 5 more rows.
ch 1, sc2tog 5 times, sl st to join.
fasten off with a 10" tail, and using yarn needle, thread yarn tail through the front loop of the remaining 5 sts and pull tight.
weave in ends.

optional loop:
fold mitten in half with thumb on the right side, attach yarn to the top left corner of ribbing, ch 10, sl st to first ch, tie knot with starting tail and weave in ends.

Thursday, August 14, 2014

crochet slippers

yeah... it's WAY too hot for slippers right now, but I've been thinking about fall to take myself to a cooler place this summer, so I made these slippers for my mom (surprise, mom!).  I think they came out pretty cute for just kinda winging it :)  I took inspiration from these slippers on Etsy from daisychain - I love the big buttons and contrasting colors she uses.
here is a basic slipper pattern from 2 create in color.  I did mine in single crochet and I did rounds instead of a going in a spiral around the toe, but the shape and construction is the same as all other basic crochet slippers.  I used Red Heart Soft in Sea Foam, with a 4.25 mm hook which gives it a more dense feeling.

toe:
make a magic ring
round 1:  ch 2, 9 dc into magic ring, sl st to join, pull ring tight - 10 sts
round 2:  ch 1, 2 sc into each st around, sl st to join - 20 sts
round 3:  ch 1, sc increase into every other st around, sl st. to join - 30 sts
(make more increase rounds to accommodate the width of your foot.)
round 4:  ch 1, sc into each st around, sl st to join - 30 sts (or maintain the amount of sts you have after you finish the increase rounds)
repeat round 4 until you have the toe of your slipper as long as you want minus 1/2" for the edging.

sides and sole:
row 1:  ch 1, sc into each st across, leaving the last sts un-worked for the opening across the top of the foot (I left about 2"), ch 1 and turn.
row 2:  sc into each st across, ch 1 and turn.
repeat row 2 until you reach your heel - you will want this to be a little snug so it doesn't slip off your heel, but not pulled so tight it cramps your toes.
sl st the heel closed and turn right side out.

edging:
round 1:  attach yarn at the center of the top of the foot, ch 1, sc around the edge, sl st to join.
round 2:  ch 1, sc until you reach the side of the slipper, then sc2tog every other st until you reach the toe again, then sc to the end and sl st to join.

toe strap:
while standing, measure from the ground at the ball of your foot to where you want your button to go on the top and make a chain that length.
row 1:  ch 2, hdc into each st across, hdc 4 more times into the last ch, and hdc down the other side of the ch, ch 2 and turn.
row 2:  hdc into each st, and 2 hdc into each of the 5 sts on the center of the curve, then hdc into each st back down the other side, ch 1 and turn.
row 3:  sc into each st, and 2 sc into each of the 6 sts on the center of the curve, then sc unto each st back down the other side.
row 4:  change colors (optional), ch 1, sc into each st around.
attach strap to the slipper and sew on button.  this is easiest to measure while the slipper is on.

I felt like the large button was a very important element, so I had to give the illusion of a bigger button by making a crochet circle to frame the smaller buttons I had.  this was done the same as the very beginning of the slipper, but I squeezed 13 double crochets into the ring instead of only 10 to make a little crochet disc that I could nest the buttons into.
only 3 hot months left before it's time to cover up chilly feet.... yes, you have plenty of time to make yourself a pair ;)

Thursday, June 26, 2014

hats and booties for Nigeria

the sewing group I'm in sends newborn hats and booties to The Eku Hospital in Nigeria.  these are the patterns that I like to use:
Booties pattern by Paula Daniele from Crochet Hooks You.  these are pretty simple to do, and they look great.  she does her double crochet 2 together different, but I'm sure any way will do fine.
I can't seem to find the exact hat pattern I use from memory, but it could be that the pattern in my head is a mixture of a bunch of different hats I've made!

round 1:  make a magic circle, ch 2 (counts as 1st dc), dc 9 times into loop, sl st into top of ch 2 to join, pull tail tight to close hole (10 sts)
round 2:  ch 2, dc into same st, 2dc into each st around, sl st into top of ch 2 to join (20 sts)
round 3:  ch 2, dc into same st, *dc into next st, 2 dc into next st, repeat from * to end, sl st into top of ch 2 to join (30 sts)
round 4:  ch 2, dc into same st, *dc into next two sts, 2 dc into next st, repeat from * to end, sl st into top of ch 2 to join (40 sts)
round 5:  ch 2, dc into each st around, sl st into top of ch 2 to join (40 sts)
repeat round 5 until desired length is reached (I did 7" to have enough for a cuff), fasten off, and weave in ends.

I've attached buttons, flowers, and bows to the hats I've made, but they can definitely stay plain and still be cute.  I also use different yarns and hook sizes, so depending on what I use I check this chart to see if the sizing is good.

Thursday, August 29, 2013

scalloped washcloth pattern

I saw some dishcloths online and wanted to make my own as washcloths for Mother's Day with some cotton twine I had.  I studied the picture and came up with how to do it.  while writing my pattern it seemed a little difficult to follow, but this is really an easy one to do - I just don't know how to write it out so it's not confusing!
a cotton yarn like Sugar and Cream with a size 5.5mm hook works well with this pattern.

ch = chain
dc = double crochet
sc = single crochet
sk = skip
sl st = slip stitch
st = stitch

round 1:
12 sc into loop, pull tail tight, sl st into 1st st to join round

round 2:
ch 5 (counts as 1 dc and ch 2 corner)
*1 dc in next 3 sts, ch 2 to make corner, repeat from * 3 times
sl st in top of the first dc (the ch 3) to join round, and sl st into ch 2 corner space
total of 12 dc sts (including beginning ch 3)

rounds 3-8:
ch 3 (counts as first dc)
1 dc, ch 2, 2 dc into corner space
*1 dc in between each dc from previous row
2 dc into the ch 2 corner space, ch 2, 2 dc into same ch 2 corner space
repeat from * 2 more times
1 dc in between each dc on the last side
sl st to join into first dc (the ch 3 from beginning of row), and sl st into ch 2 corner space
total of 24, 36, 48, 60, 72, and 84 dc sts (including beginning ch 3)

round 9:
ch 3 (counts as first dc)
8 dc into ch 2 corner space
side: (sk 2 dc sts and sc in between dc sts, sk 2 dc sts and do 7 dc in between dc sts) - repeat 3 times
corner: (sk 2 dc sts and sc in between dc sts, 9 dc into ch 2 corner space - you'll be skipping 3 dc sts this time)
repeat side and corner for the next 2 sides
repeat side once more, then sl st into the top of the ch 3 of the 1st corner to join round
weave in ends
total of 168 sts (including beginning ch 3)

optional:
if you want to add a loop to hang the washcloth from, when you get to the 4th corner, between the 4th and 5th dc, make a ch 10 and sl st to the first chain, then continue in the pattern.

once you get the hang of these, they whip up in no time.  this one is sort of a mindless project for me, but I think a video might work better to see that than my written pattern.  I will try to work on that.

Thursday, June 13, 2013

crochet pacifier clip

a friend of ours had a baby girl recently and I wanted to make her something, so I searched to see what would be cute and quick to do.  I decided on a crochet pacifier clip like this one from BerryCuteBaby.
with doubled embroidery floss and a 3.25mm hook, I did a row of foundation double crochet until it looked about as long as I wanted, then did a row of double crochet down the other side and ended with a chain loop.  I fed the end through the end of a suspender clip and stitched it down real good, then stitched down a flower over that because to get it tight and secure on the clip it looked kinda... meh.  the flower made it cute and served its purpose to cover my sewing.
even if she ends up not liking pacifiers, this works good as a leash for teething toys.

Thursday, March 14, 2013

granny squares

my mother-in-law needed some help with a granny square pattern recently, so now I'm in a granny square mood!  I found this cool bobble spiral pattern that I really like :)  this would be cool to make really big and use as a baby blanket or something.
for now this is finished, so I think when I expand more of the pictures on my walls I'll just hang this up as filler until I collect more pictures.  maybe I'll frame it... I dunno.

Thursday, December 6, 2012

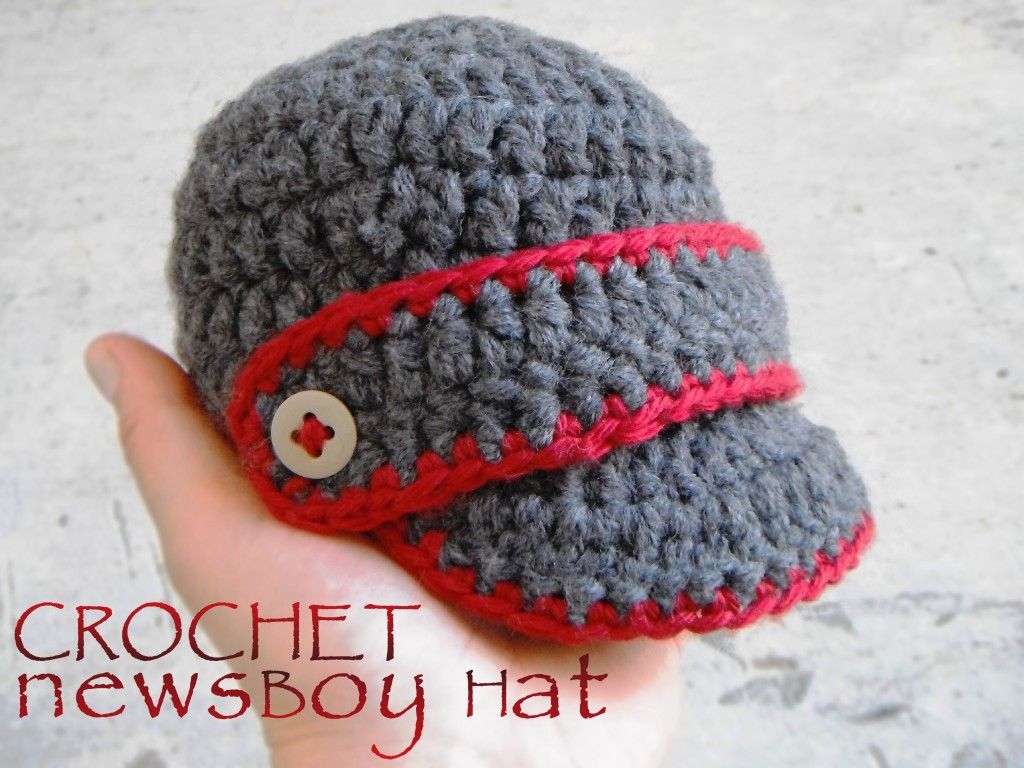
baby newsboy hat

I had some yarn left over from the grey and red loafers I crocheted, so I thought I'd make a matching hat.  I google image searched and found this adorable hat :)  I didn't have the size hooks called for in the pattern, and my yarn is a little thicker, so I had to fudge it here and there.
I did the strap across the front the same as the strap for the loafers, I just made it longer.
it was an easy hat to make once I got the sizing right, and I might attempt another in the future, but for now I just like looking at this one and imagining it on Jack's little head :)

Thursday, November 29, 2012

baby loafer pattern

I finally made another pair of crochet loafers and took down the pattern - yay!  these can be done all in one color, or change colors as you go.  the first pair just had the sole and edges in a different color, but for the 2nd pair I did the toe decrease in a different color as well.  you can change colors anywhere you want and make them look however you'd like.

I used a size 5.5mm hook and worsted weight yarn, which gave me a sole measuring about 3.5".  I used a slightly smaller weight yarn and the same hook and got 3", so once you've finished the first 2 rounds for the sole, measure it and see what you're at to get the right size before moving up to the sides in round 3.

1st round:
7 fhdc
4 hdc into last st
1 hdc into next 6 sts
4 hdc into last st
sl st to join
total of 22 sts

2nd round:
ch 1
2 hdc in the same st
1 hdc in ea of the next 6 sts
2 hdc in the next st
1 hdc in the next st
2 hdc in the next st
1 hdc in the next st
2 hdc in the next st
1 hdc in ea of the next 6 sts
2 hdc in the next st
1 hdc in the next st
2 hdc in the next st
1 hdc in the next st
sl st to join
total of 28 sts

3rd round:
ch 1
1 hdc in back loop of each st around
sl st to join
total of 28 sts

4th round:
ch 1
1 hdc in each st around
sl st to join, cut yarn and weave in end
total of 28 sts

5th round:
fold shoe in half and find middle of toe, count back 8 sts and attach yarn one st back with a sl st
(you'll have 16 sts around the toe, and 12 sts around the back of the loafer)
ch 1
1 hdc into same st as ch and into the next 11 sts around back of loafer
8 dc2tog into back loop of next 16 sts for the decrease of the toe
sl st to join
total of 20 sts

finishing toe:
ch 1, turn
4 dc2tog into next 8 sts
sl st to join to other side of loafer
1 sc in each st around back of loafer to finish edge
sl st to join at other side
weave in ends

toe strap:
6 fhdc
3 hdc into last st
1 hdc into next 5 sts
3 hdc into last st
sl st to join
total of 17 sts

finishing edge:
1 sc into same stitch as join and in the next 6 sts
2 sc into next 2 sts
1 sc into next 6 sts
2 sc into last 2 sts
sl st to join
weave in ends
total of 17 sts

place the strap across the toe of the loafer and sew in place through buttons on either side.

Thursday, August 23, 2012

more baby crochet

 
I made these for a friend of mine who had her little girl a few weeks too early.  I looked online for some crochet patterns and found this hat pattern, and this really quick and easy bootie video tutorial.
 
after hunting for the hat, I decided it was simpler to find regular baby patterns and adjust to make them fit the measurements I needed (which I got from here) than to find a preemie sized pattern.
 
I added an extra row of puff stitch and two rows of single crochet at the bottom on the hat instead of one like the pattern said to do so it was closer to the measurements I was looking for.
 
for the booties I used a smaller hook than what the lady in the video did, and I only made the toe 1.5" long, and 1.5" for the sides and back so it was the recommended 3".
they look so small to me, but I've been gauging her size from photos of her head and feet compared to peoples hands as well as going off the size chart for 4-5lb babies.  I'm still worried they won't fit, but they worked up so quick I can always whip up another set if I need to.

Thursday, August 16, 2012

crochet washcloth

I crocheted some washcloths to put in a basket for my Nana's 80th birthday.  I used a natural looking ecru yarn by Sugar 'n Cream and this pattern.  with an H hook, the 2.5oz skein got me two washcloths with maybe 12" left over!  cuttin' it a little close so I'm glad I was able to make two finished washcloths and didn't have to buy another skein just for a few yards or something.  I'd like to do more but I think each one took me about two hours to do, so if I have time and get a chance I might go get another skein and make two more.
I ironed some ribbon to a piece of 8.5"x11" freezer paper and ran it through my printer to make the label so she sees that I made them for her in case I don't get to see her open the basket.  makes it cute, too :)  there's so many tutorials out there that tell you how to use your inkjet printer to print on fabric, but here's one I found that covers the basics.  I don't recommend using ribbon for smaller fonts since it spreads a little before the ink dries and looks fuzzy.  since this is just packaging, and even though I heat set it after I printed, it won't make it through the wash.  there is some kinda liquid stuff (Bubble Jet Set, I think) you can treat fabric with to make it washable after printing, but I haven't tried any yet.

Monday, July 2, 2012

crochet cuff

I don't remember what I was searching for, but I came across this pattern online and thought it'd be a good sitting-still project that I could do while not moving and keep my mind off of things.  the pattern does say that it's a fairly small bracelet (6 1/2"), and I think mine came out a little smaller, so if you need it longer maybe add an extra row to each end or something.  it works up fairly quick, but after two I was satisfied enough to stop!
I used regular 6-strand embroidery floss ('cause that's what I had on hand) and a 3.25mm hook, which I thought was gonna be a pain in the butt, but it's not so bad to work with. I stiffened it with hairspray so it'd hold its round shape in the middle, and added a button to the end.
the next one I did with 3 colors, sorta just played it by ear for the flower part, and paid more attention to my tension.  I didn't stiffen this one so that it stayed soft (the stiffness of the first one makes me feel sick - weird, I know).
I'll probably need to give it time before wearing them since thinking about putting on jewelry is an unsettling feeling at the moment, but I'm glad I tried them out and feel a little more confident about using a smaller hook on future projects.

Thursday, May 10, 2012

knot for Leo

I made Leo some friendship bracelets to wear last summer that are now framed and up on my Leo wall of fame in the living room.
he was a sport and wore them for 4 months without a problem! I'm trying to make it a summer tradition to make him new ones every year and these are what I did for 2012.
the top one is a zigzag pattern in yellow and black, the middle one is basic letters that I made on a grid, and the bottom one is a 5-strand flat braid like I did on my flip flops strap. I finished them all off by leaving tails to tie together that I fishtail(or fishbone?) braided.
I tried the same 5-strand flat braid with 7 strands for a friend. I'm sure it could be done with many more and I want to try a really wide one... some day.
I was worried that because Leo's older he might mess with them, but he actually seemed excited to wear them (maybe he remembers) and sat still with his arm out for me to put them on! he doesn't seem to notice they're there now.

if you're new to friendship bracelets, here are the 4 basic knots:


Thursday, April 12, 2012

doily baby rug


I picked up some thick yarn to make a baby blanket with thinking it'd go real quick, and it actually did!
the pattern said to use super bulky yarn, and a size 9mm hook. the pattern's suggested hook size was bigger than the bulky yarn package suggested to use, but I thought the 9 was still too small so I did a 10.

I liked how it was coming together, but it just seemed too thick to be a blanket.

I kept going thinking as it got bigger maybe it'd make more sense, but after it was finished I was leaning more towards it being a rug instead.