Showing posts with label video tutorial. Show all posts

Thursday, August 21, 2014

corner to corner triangle shawl

I crocheted this shawl for a friend of mine using the corner to corner afghan tutorial from The Crochet Crowd, with 4 skeins of Caron Simply Soft yarn, and a 6mm hook.
I've made scarves with this pattern in the past, but this is the first time I've used a solid color yarn.  with variegated yarn the focus is the patchwork of color, so I never noticed before the cool texture it makes!
instead of a rectangle or a square, I did a triangle.  I just increased like the pattern says to, and when I thought it was long enough I simply didn't decrease back down to the other corner.  I did a scallop around the two straight edges to match the "unfinished" long edge, but this is totally optional and I think I'd skip it if I did this one again.


if watching a video isn't your thing, here's a link to a written pattern provided by Artiamus Imura: Corner to Corner Triangle Shawl

Thursday, July 24, 2014

quilt-as-you-go

I made a toddler size quilt out of some fabric that already had a pieced look to it.  the fabric I was given wasn't big enough to be the top by itself, so I added more squares to it and tried quilt as you go with this joining method from the Gourmet Quilter.
I'm not a rainbow and bright colors kinda person, but I really like making bold colored quilts like this, especially paired with black to make everything pop.
compared to traditional quilting like I did on my crazy quilt, it's definitely easier to work on smaller squares to join them up later.  it's also a great way to use up smaller pieces of fabric because you don't have to have a large solid backing, and you have the option for a reversible quilt.  this would make a great group project as well.  so many wins for this one!  I will keep this in mind for future quilts.

Thursday, July 17, 2014

pillowcase dresses

I helped make pillowcase dresses that went to Colombia earlier this week.  we completed 84 - yay us!  these are very simple to make and super cute. Hobby Lobby has an easy to follow video on making these, and a size chart for size 2T up to 8.
I surged the raw edges and turned them under instead of using bias tape under the arms because I wanted to crank out as many as possible.  don't panic if it looks bunched up and funny after sewing the fabric under the arms - once it's ironed it lays flat and it's fine.
  
something else I do different than the pattern is making the ties come out the center back of the casing instead of tying at the shoulder.  I thought it'd be harder for the younger ones to try to pull at the bow if they couldn't easily reach it, but the strap can be shifted to tie at the shoulder for the older ones that dress themselves.
the deal was cookies for a picture, and to not tell daddy what we did that afternoon!
I iron down the top edge 1", open it up and mark two lines within the casing, and sew a rectangle in the back seam making sure to reinforce at the top and bottom so the seam doesn't come undone.
  
I separate the seam and clip the stitches within the rectangle I just sewed to make the opening for the strap ends to come out of, then stitch the casing down.
  
these are the cute projects I miss out on when only having boys, so hopefully there are some girls in our future so I don't scar my sons with memories of trying on girlie things...even if it is for a good cause ;)

Thursday, September 12, 2013

fresh shaken

I've been making my own whipped cream for a while because it tastes so much better than what ya buy at the store, but I would end up with leftover heavy cream that would just spoil in the fridge if I forgot to use it all up before we ate all our dessert.  felt like such a waste.  even more so when I found out I could make butter from soured heavy cream...  gah!  who knows how much potential butter I've tossed throughout the holidays :(
anyway, so I tried it on half of a quart of cream that got lost in the back of the fridge and was about a month out of date... it was the best butter I've ever had!  also, the best arm workout.  win win win :)
I used the mixer the first time which gets the job done much faster, but I think if I'm going to be eating more butter I should get a good work out first and just shake it in a jar ;)

I got 2 cups of butter from 1 quart of heavy whipping cream, with about 2 cups whey leftover, which is apparently what "traditional" buttermilk is. makes me think I could use the whey in place of water with powdered buttermilk for a richer buttermilk pie.  I'm so excited for holiday baking!
"traditional" buttermilk
my arms are incredibly sore after an hour+ of shaking, and it's not really cheaper for me to make the butter and buttermilk (unless I get a good deal on cream), but it's so much better when it's homemade so I'll be making it for the holidays and special stuff... or maybe when I need a good workout :)

Thursday, July 18, 2013

chocolate butterflies and pistachio cream cheese pie

I watched a video from How To Cook That showing how to make chocolate butterflies, and I thought it would be perfect to decorate a pie I made for Nana.
I did the butterflies with candy melts because I didn't want to mess with tempering chocolate.  a few of them didn't work out because they were too thin and it's HOT right now, so if they didn't crack while I was trying to peel them from the wax paper they melted when I touched them, but I made them a little thicker they did just fine.
I thought I came up with the pie recipe myself, but after a quick search I found it on cooks.com and it was exactly how I thought about doing it, so I went with just the addition of cream cheese to the pudding like it was written.  I would double the cream cheese next time, use less milk as if for a pie (1 3/4 cup instead of 2 cups), and maybe use heavy cream or evaporated milk instead of regular whole milk.  it was still good as it was - just a little mild for my taste! O:)

Thursday, November 1, 2012

hugs and kisses

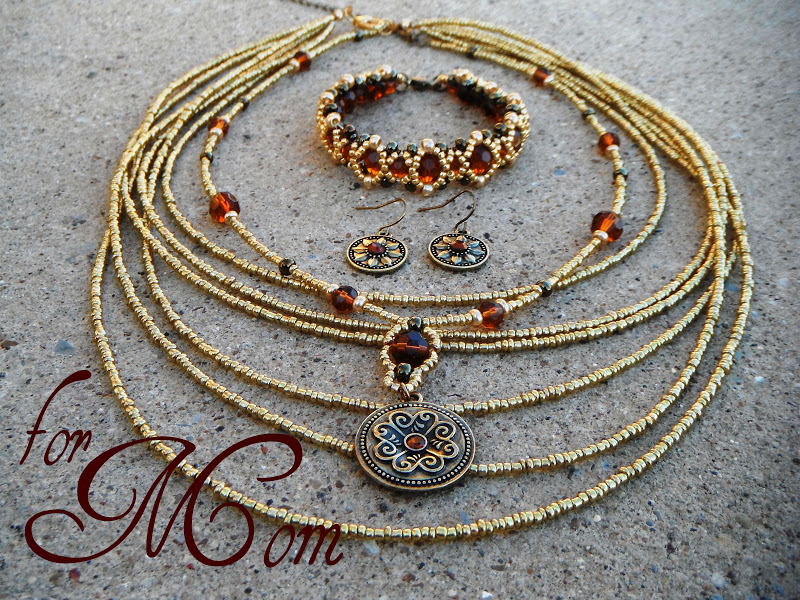
I really enjoy watching Beadifulnights' tutorials on youtube.  they're clear and easy to follow and when I bead along while watching I feel like I all of a sudden have something cool I couldn't have figured out on my own when I'm finished.  I loved the Hugs and Kisses bracelet when I saw it and wanted to try it, not really expecting it to turn out, but it did!
  
I used these earrings as color inspiration and made the bracelet to match as best as I could get it to.
  
when I was finished I decided it needed a necklace set to go with it so I searched for a pendant and found one with a couple of smaller ones that could be used as earrings that worked great with the colors of the bracelet.
it still looked like it was lacking so I added another necklace with some simple strands of beads and that did the trick! 

Thursday, September 6, 2012

pretty beans

I've been watching OneVeryHappyBird on youtube recently while eating lunch.  she has some simple and cute ideas, and her voice is soothing to listen to!  I loved the doily gift bag she made and was able to try it out finally on a bag of Boston Baked Beans for my Nana's birthday basket.
I got the candy that comes in a box since it's already in a clear bag, and I glued a small doily on top and added the tag I cut from the end of the box so she knew what they were.
I think it looks a little more special and it was quick and fun to make :)

Thursday, August 23, 2012

more baby crochet

 
I made these for a friend of mine who had her little girl a few weeks too early.  I looked online for some crochet patterns and found this hat pattern, and this really quick and easy bootie video tutorial.
 
after hunting for the hat, I decided it was simpler to find regular baby patterns and adjust to make them fit the measurements I needed (which I got from here) than to find a preemie sized pattern.
 
I added an extra row of puff stitch and two rows of single crochet at the bottom on the hat instead of one like the pattern said to do so it was closer to the measurements I was looking for.
 
for the booties I used a smaller hook than what the lady in the video did, and I only made the toe 1.5" long, and 1.5" for the sides and back so it was the recommended 3".
they look so small to me, but I've been gauging her size from photos of her head and feet compared to peoples hands as well as going off the size chart for 4-5lb babies.  I'm still worried they won't fit, but they worked up so quick I can always whip up another set if I need to.