
I watched some videos on making fried marbles (or baked marbles, since that's a common way to do it now) and did some image searching for project ideas. there's some pretty cool stuff out there that people have done that looks super simple. I love this one - on the lookout for small round marbles now!
I have really been wanting to make some for a while so I finally picked up some flat marbles at the Dollar Tree and E6000 from Michael's to try this little number out.

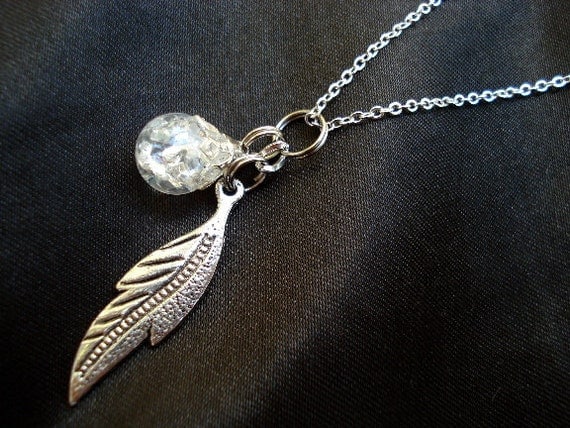
I made some wire bails while I baked my marbles and whipped up a few quick pendants during nap time.
 it might be that I'm more sensitive right now, but it took about a week or so for the adhesive stink to go away - something to keep in mind next time I need to use that glue!


I noticed that the darker ones didn't shatter as much on
the inside. I don't know if they should be heated longer or what. I did
mine at 500°F for 30 minutes. they sizzled and popped when they went
into the ice water like it said they should in the tutorial, and I could see the light
colored ones had small fractures throughout immediately. I left them in
the water for 15 minutes waiting for the darker ones to finish up, but
they pretty much had just a few larger cracks through them and that was
it. I tried re-baking some, and that didn't really do anything except make some of them break apart.

I might try alcohol inks someday if I revisit this type of project so I can just use the clear ones that crack really nice and make them whatever color I want.
22 comments:
you need to check the type of e6000 glue. I also grabbed one and it stank horrid! I used it on beach rocks my kids collected on a vaca, and unfortunately the frame still smells(2+months later) :( Anyway I found out via my dad there is two kinds. one for Automotive and one for crafters... sure enough the stinky was Auto and I had grabbed it. I have since passed that on to my dad and bought the crafters brand. MUCH less odor and it goes away in less than 30 minutes! Hope this helps. :)
is there a way to tell which is which? I bought it from a craft store and it doesn't specify "craft" or "automotive" on it, it just says "Amazing" on the top and "Industrial Strength" along the side. I would prefer the stronger glue, so if the craft version doesn't hold as well I can put up with waiting for it to air out, because it did after a little time.
I want to make these so bad but first and foremost I want to make the wire bails. Do you have a tutorial on that or a link to the one you used? It sure would be appreciated. Thanks so much. Love your projects.
thanks, Pam :) I was thinking about making a tutorial on the bails while I was doing them, but never ended up doing it. I'll try to get something up soon for ya!
I love these, and can't wait to try them. I am also very interested in your wire bails. How difficult are they to make? I am a beginner. Can you do a tutorial please with the kind of wire and how to make them so pretty. Thanks
they're super easy to do. these were my first bails to make, and use! I'll bump up the how-to in my schedule of posts.
I too am interested in the wire balls and how you made them...you are a great inspiration!
thank you, Susan! there's a link to my how-to under "wire bails" in this post.
I think the alcohol ink idea would be worth trying for sure. Great tutorial. TFS!
Where can i buy the wire bails? i am looking for wire bails already bent to shape.Do you know where i can find those to purchase? or were you willing to make 100 of those for me and at what cost?
You can get glue on bails at any craft store and lots of places online. I would check Etsy for the wire style. I've never looked at buying the wire kind since they're so simple to make, but they're probably out there somewhere for sale. Good luck!
Late to the marble party but I noticed that your marbles appeared to be flat on one side, instead of round. How did you achieve this?
I got flat marbles to start out with. You can get them at any craft store, or sometimes dollar stores.
I have a great hack for all who use E6000. Take a small zippy bag and put the open tip of the glue close to the corner, dispense a small amount of glue (about how much you expect to use today). Close the tube. Trim a tiny corner off the bag and dispense it like you would frosting. Keep in mind you can always make the cut bigger, not smaller, so make it smaller to start with. Stop earlier than expected to learn timing to stop cleanly. Hope this helps.
Chances are if you bought it from a craft store it's not likely going to be automotive grade. Don't forget this IS a stinky glue, they warn to use good ventilation.
Chances are if you bought it from a craft store it's not likely going to be automotive grade. Don't forget this IS a stinky glue, they warn to use good ventilation.
I actually tried it for the first time this morning and I have to say, they came out really cool! I tried large and small marbles. Even the dark blue ones came out pretty good, considering the fact I only left them in the oven for about 20 min and no matter how much ice you use, cold water at this time of year here in the South is not what Northerners would call cold. I even tried some of the dark blue matte finish and you can see the crackle in those also! One comment, though. The red ones I tried, turned brown and the outer (colored) layer started chipping off immediately. I won't use those again. I still had a couple of pinch bails that I wasn't using, so I cut the "pinches" out and glued the bails to the marbles (yes, the E6000, although it didn't smell too bad to me) I now have some great looking pendants!!
I had some flake on me like your red ones. They were brown I think. I just assumed they heated and/or cooled incorrectly, but I imagine whatever gives the glass its color is the reason - probably needs a different heating/cooling temp so it doesn't shatter completely.
I still can't stand the smell from my E-6000, so I guess it's just the type I have. I'm glad you tried it out :)
Most of these are old posts. I have a very sensitive sniffer due to Fibromyalgia. I have no issues with E6000 and I've been using it for years. It is dependable and it's best to let it dry overnight or at least 8 hours. It is a wonderful tool and I have jewelry and all sorts of projects that are still intact after quite a number of years.
I just checked my tube of E6000 (Clear)and it says Industrial Strength. Funny thing, at Walmart in the US, it is cheaper for the same size tube in the craft department than in the hardware compartment. BTW, Walmart is the cheaper than anywhere else I've found. I get the 2.0 fl oz (59.1 ml)size. Oh, and make sure you get CLEAR. They have white, I know and I'm not sure if that would dry clear. I never checked, but it comes in Clear anyway at the same price.
I got so caught up in the E6000 discussion, I forgot to comment on this wonderful project. I just did it according to your instructions and they turned out great and of course, I had the same results with the colored ones, even the ones with the cloud-like look in the clear. But that's okay. I'm going to try Alcohol Ink on these lovely crackled gems and I will let you know how they turn out. I'm not computer savvy, so I don't know how to get pics on here. Thank you so much for your concise instructions and great pictures. I love glass gem projects!
Thanks for sharing, nice post! Post really provice useful information!
Giaonhan247 chuyên dịch vụ vận chuyển hàng đi mỹ cũng như dịch vụ ship hàng mỹ từ dịch vụ nhận mua hộ hàng mỹ từ trang ebay vn cùng với dịch vụ mua hàng amazon về VN uy tín, giá rẻ.
Post a Comment