Showing posts with label craft. Show all posts

Thursday, December 18, 2014

paint prints for Christmas

the boys and I found some time after Thanksgiving to do a little Christmas crafting for their grandmothers.  this holiday season wasn't feeling much like Christmas for me for various reasons, but I really wanted to make these cute penguin prints and I think this project helped get me more in the mood for festivities :)
I picked up a couple of white aprons from Hobby Lobby to decorate.  all the boys had to do was sit still for a black footprint, and I painted the details on after those were dry.  the simple footprints ended up being a lot messier than I remember on past paint projects.  maybe it was the black paint on the white surface... I don't know.  they still came out cute.
we added some fingerprint string lights for a border, which I think really helped finish it off.  this was time consuming, but easier to control than the footprints since we went one finger at a time instead of a whole foot.  I added their names and year as well.
there's still room at the bottoms to add more, so maybe next year we can add some reindeer.

Monday, December 15, 2014

Jack's Christmas stocking

I forgot to post about Jack's Christmas stocking last year.  poor guy has just slipped through the cracks ;)  but I did make it in time for his first Christmas.
I decided I didn't like the fabric I chose after I finished it, but I'm used to it now.  I think it makes the colored felt pop a little more.
  
he of course got a Jackalope, I put a xylophone on it to remember one of the first Christmas gifts we gave him, and his snowman is a cowboy.
I was on the fence about putting "Jackers" on it, but since that silly name has followed him beyond the family (and it'll probably stick until he's old enough to tell us to stop calling him that) I went ahead and did it.  he might not even notice.  I didn't notice mine said Candi until I was in highschool!
I loved seeing all our matching stockings out growing up, and hearing the jingle bells when they moved - such a simple but fond memory of Christmas as a kid.  it's something that I'm glad I carried over to our family :)  I'm already gathering ideas for the stocking I will be making next year!

Tuesday, November 11, 2014

advent calendar garland: crochet hats

I winged this pattern the first time and it came out exactly as I hoped, so I wrote it down.  I did it bottom up, which I normally don't like to do, but this one made sense to do that way since it was pointy, and the ribbing would match the look of the mittens and stockings (patterns available here and here).  you'll need 12 hats for the garland.
hat pattern

ribbing:
ch 7, 1 sc into back bump of 2nd ch from hook and following 5 sts, ch 1 and turn.
1 sc into back loop of each st across, ch 1 turn.  repeat for 26 more rows.
fold ribbing in half and sl st closed.

body of hat:
ch 1, make 30 sc sts, equally spaced, around the top edge of ribbing, sl st to join round.
ch 1, sc into each stitch around, sl st to join.  repeat for 4 more rounds.

decreasing:
ch 1, *1 sc into next 4 sts, 1 sc2tog, repeat from * 4 more times, sl st to join.
ch 1, 1 sc into each st around, sl st to join.
ch 1, *1 sc into next 3 sts, 1 sc2tog, repeat from * 4 more times, sl st to join.
ch 1, 1 sc into each st around, sl st to join.
ch 1, *1 sc into next 2 sts, 1 sc2tog, repeat from * 4 more times, sl st to join.
ch 1, 1 sc into each st around, sl st to join.
ch 1, *1 sc into next sts, 1 sc2tog, repeat from * 4 more times, sl st to join.
ch 1, 1 sc into each st around, sl st to join.
ch 1, 5 sc2tog, sl st to join.
ch 1, 1 sc into each st around, sl st to join.
fasten off with a 10" tail, using yarn needle, thread yarn tail through the front loop of the remaining 8 sts and pull tight.
weave in ends.

attach pom pom to top of hat.

optional loop:
fold hat in half, attach yarn to the top left corner of ribbing, ch 10, sl st to first ch, tie knot with starting tail and weave in ends.

Sunday, November 9, 2014

advent calendar garland: crochet mittens

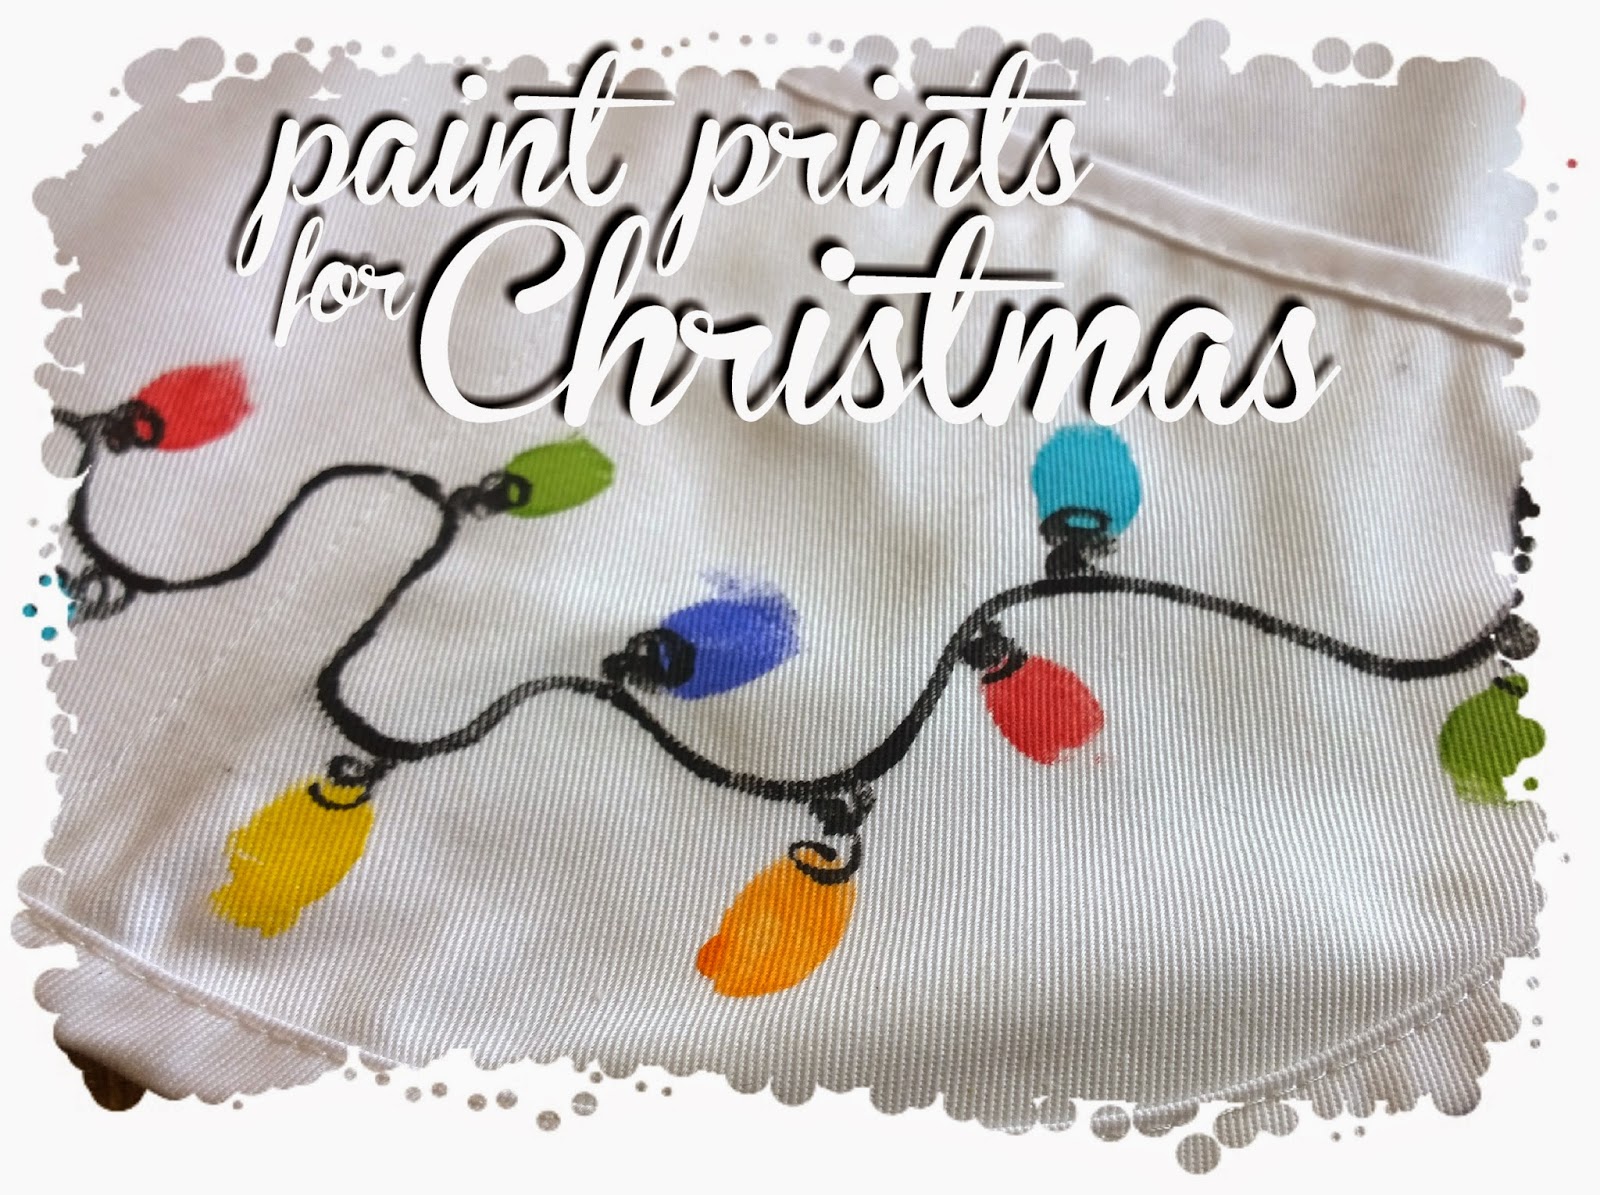
I saw a mini mitten garland in one of the shops on the Strand in Galveston and thought along with some stockings and hats, it would make a cute little advent calendar.

I started crocheting November 1st, my goal to make one a day so by December 1st it would be ready to go.  I always cram too much into my holiday seasons, why would being pregnant, having an ill household, and house hunting make the slightest difference in the workload I put on myself? :\  so far it's going okay, though.  one a day is definitely a doable goal.

I'm using up leftover scraps from my yarn stash, other stuff I had on hand, and the patterns are free.  this project mostly cost me my time in the evenings while I watch TV, so besides it coming along to be adorable, it is practically free and I love that! :)

so this first pattern is mittens.  you'll only need 6 of these. I would say this is the more difficult of the patterns, so once you learn this one the rest will come easier.

the preschool size mittens pattern from CrochetMe is what I'm using.  I usually prefer videos, but this written pattern is easy enough to follow.  I think hers is worked in a continuous circle from the way it's written, but the copy I have below is written so that each round is joined.  it's still basically the same, I just typed it out so it was easier for me to work from.

mitten pattern

ribbing:
ch 7, 1 sc into back bump of 2nd ch from hook and following 5 sts, ch 1 and turn.
1 sc into back loop of each st across, ch 1 turn.  repeat for 19 more rows.
fold ribbing in half and sl st closed.

body of mitten:
ch 1, make 23 sc sts, equally spaced, around the top edge of ribbing, sl st to join.
ch 1, 1 sc into each of the next 10 sts, 2 sc into the next st, 1 sc into each of the next 2 sts, 2 sc into the next st, 1 sc into each of the next 9 sts, sl st to join.
ch 1, 1 sc into each st around, sl st to join.
ch 1, 1 sc into each of the next 11 sts, 2 sc into the next st, 1 sc into each of the next 2 sts, 2 sc into the next st, 1 sc into each of the next 10 sts, sl st to join.
ch 1, 1 sc into each st around, sl st to join.
ch 1, 1 sc into each of the next 12 sts, 2 sc into the next st, 1 sc into each of the next 2 sts, 2 sc into the next st, 1 sc into each of the next 11 sts, sl st to join.
ch 1, 1 sc into each st around, sl st to join.
ch 1,1 sc into each of the next 13 sts, 2 sc into the next st, 1 sc into each of the next 2 sts, 2 sc into the next st, 1 sc into each of the next 12 sts, sl st to join.
ch 1, 1 sc into each st around, sl st to join.
ch 1, 1 sc into each of the next 14 sts, 2 sc into the next st, 1 sc into each of the next 2 sts, 2 sc into the next st, 1 sc into each of the next 13 sts, sl st to join.
ch 1, 1 sc into each of the next 12 sts, skip the next 10 sts (for thumb), 1 sc into each of the next 11 sts, sl st to join.
ch 1, 1 sc into each st around, sl st to join.
repeat previous round for 9 more rounds.
ch 1, [1 sc into each of the next 6 sts, sctog] 2 times, 1 sc into each of the next 5 sts, sc2tog, sl st to join.
ch 1, [1 sc into each of the next 3 sts, sc2tog] 4 times, sl st to join.
ch 1, 1 sc into each st around, sl st to join.
ch 1, sc2tog 8 times, sl st to join.
fasten off with a 10" tail, using yarn needle, thread yarn tail through the front loop of the remaining 8 sts and pull tight.
weave in ends.

thumb:
join yarn to any thumb stitch and make 10 sc stitches around, sl st to join.
ch 1, 1 sc into each st around, sl st to join. repeat for 5 more rows.
ch 1, sc2tog 5 times, sl st to join.
fasten off with a 10" tail, and using yarn needle, thread yarn tail through the front loop of the remaining 5 sts and pull tight.
weave in ends.

optional loop:
fold mitten in half with thumb on the right side, attach yarn to the top left corner of ribbing, ch 10, sl st to first ch, tie knot with starting tail and weave in ends.

Thursday, February 20, 2014

another flip flop project

last October my mom and I worked on some flip flops for our vacation craft, and I just finished mine over the weekend!  that's how far down on my to-do list completing them was.

I watched this video (it's not in English, but you can see what's being done) and thought it looked easy enough that my mom and I could tackle it in a few days (well, she was able to!).
it's a basic macrame knot around the straps, with beads strung on one of the ribbons.  I used the thinnest ribbon they had at the craft store, 6/0 seed beads, some polymer clay beads I made forever and a day ago, and the middle beads at the toe were just flat glass beads.

if I'm lucky, I'll be able to do another pair this summer, but I really wish I had the time to make a pair like Luis Quintero - I love watching him macrame sandals, even if I have no idea what he's saying!

Thursday, July 25, 2013

drawstring pouch

earlier in the year we spent a lot of time watching TV when Matt came home at night and on the weekends.  we thought we should cut back and not watch TV during the week, so we've been playing cards and dominoes or working the occasional puzzle in the evening after the kids go to bed.  I looked online to see what new games I could find and I came across rules for a simple domino game called Matador.  it's played with double sixes and it's pretty easy.  I think the boys will like playing this one when they're older.
inspired by a little pouch a friend gave me a long time ago, I crocheted a little drawstring pouch to hold the mini dominoes, then made another to give away.

I used a size 3.25mm hook and embroidery floss.
round 1: 12 SC into a magic loop, pull tight (do not sl st to join the round - this is worked in a continuous spiral)
round 2: 1 inc. (2 SC into 1 st) in each st around (24 sts)
round 3: 2 SC, 1 inc. repeat around (32 sts)
round 4: 3 SC, 1 inc. repeat around (40 sts)
round 5-30: 1 SC into each st around (40 sts), sl st to last st to even out the top of the round, and weave in the ends.  use crocheted or braided embroidery floss for the drawstring.

fold the pouch flat,
start on one side and weave between the stitches until you reach the side you started on.
repeat for the opposite side
and tie the ends in knots so they don't come out.
I wasn't sold on crocheting in a spiral because the uneven break in the stripe kinda bugged me on the ombre-ish bag and I tried to hide the color change step on the side, but the black and white stripes made it look cool, so I positioned it for the front (or back) of the bag.

Monday, June 10, 2013

dinosaur and robot

I was asked to make some props for Audacity Theatre Lab's play Dinosaur and Robot Stop a Train like the Blork doll I made a few years ago.
aren't they just too cute??  I was worried I wasn't gonna be able to pull it together and make it all work, but it did and it took me all the way up to the deadline to finish them!  I forget how much free time I had before kids when I try to tackle something that would have taken an afternoon to complete a few years ago and it takes me a month now.
the play is in the Festival of Independent Theatres at the Bath House Cultural Center until June 22nd - go see it!

Thursday, May 2, 2013

granny squares pillow

for my mother-in-law's birthday I made up a bunch of granny squares and tacked them to a pillow I made.
I used this pattern with a 3.25mm hook and doubled embroidery floss.
I made the pillow from a couple of dinner napkins and did a blanket stitch around the edge.  it was a little time consuming but I'm happy how it came out :)
I liked using the embroidery floss for this because I could get so many different colors and I only needed a little for each square so it didn't cost a lot to have a variety of colors.  the strands would separate once in a while, so I wasn't able to crochet as fast as I normally would and needed to really pay attention so I didn't pull up a strand from the wrong loop, but other than that it was pretty easy to do.

Thursday, January 3, 2013

sound ornament

I was going to try and make an ornament for the grandparents this year with Leo's prints or something on it, but I just didn't have the time.  I did happen to see this post a couple of days before Christmas and thought I might be able to tackle it in time - which I did, just didn't get pictures of them all!
I grabbed some fabric ornaments from Target and voice recording devices from Build-A-Bear.  Leo wasn't cooperative when it came to getting him to say something, but I managed to get them done Christmas Eve.  it's not fun if you're not cutting it close, right?? :\
we'll see how well it holds up in storage and I might try again next year when he's more likely to say more things and possibly on command!

Thursday, December 20, 2012

glasses

I saw this cool project for etching the bottom of a pint glass.  I thought this would be a perfect gift for my sister-in-law's boyfriend.  I used clear contact paper with my Silhouette (this machine makes so many things so much easier!), etching cream I got from Hobby Lobby forever ago, and a set of 4 small tumblers (the bases were bigger than regular pint glasses) that I got from Target.

 
as happy as I was at how well the first one came out, I thought I'd make each glass different.
I googled warnings and came across some to use,
and Matt helped out with this one - of course ;)  we're fans of The IT Crowd so I couldn't turn down one involving Rohypnol!  gotta love Moss :)
this one is probably my favorite.  it's a bit of a departure from the original idea, but still fits with the recipient's humor.

these worked up quickly and were surprisingly easy to do.  I've etched glass before and for some reason it was a big headache, but this project went very smoothly and I am excited to give them away :)

Thursday, September 6, 2012

pretty beans

I've been watching OneVeryHappyBird on youtube recently while eating lunch.  she has some simple and cute ideas, and her voice is soothing to listen to!  I loved the doily gift bag she made and was able to try it out finally on a bag of Boston Baked Beans for my Nana's birthday basket.
I got the candy that comes in a box since it's already in a clear bag, and I glued a small doily on top and added the tag I cut from the end of the box so she knew what they were.
I think it looks a little more special and it was quick and fun to make :)